
Particle Tracking
The particle tracking function (see
fig-particle-tracking-dialog) in MINEDW investigates
potential capture zones for pumping wells or general
groundwater movement in the system. Particle tracks are calculated
after completing a model run using data stored in the .PLB file.
Information required for particle tracking simulations is described
below.
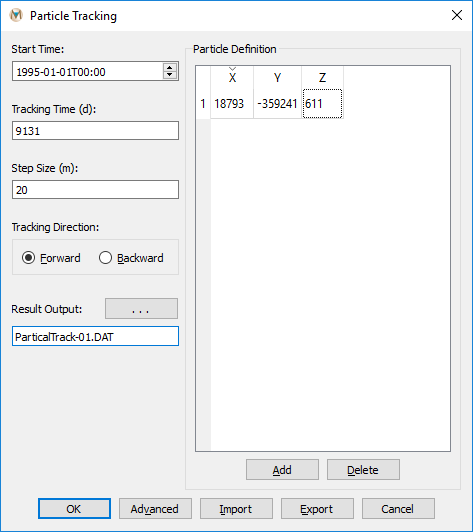
Figure 1: The “Particle Tracking” dialog box in MINEDW
- Start/End Time:
Start or end date for particle tracking. For “Forward” tracking, this is the start time; for “Backward” tracking, the end time.
- Tracking Time (days):
Duration of particle tracking.
- Step Size (m):
Distance particles traverse per step.
- Tracking Direction:
Forward or backward (reverse time) tracking.
- Add:
Creates entry for particle XYZ coordinates.
- Delete:
Removes selected particle entry.
- Import:
Loads existing particle-tracking file.
- Export:
Saves current particle-tracking configuration.
- OK:
Calculates tracks and closes dialog.
- Cancel:
Closes dialog without calculating.
- Results Output:
Output file location and name.
- X, Y, Z:
Particle starting or ending coordinates.
- Advanced:
Opens the “Advanced Options” dialog box.
Advanced Options
The Advanced Options dialog provides additional control over particle tracking interpolation methods.
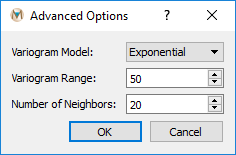
Figure 2: The “Advanced Options” dialog box
- Variogram Model:
Selects “Exponential,” “Spherical,” or “Gaussian” variograms for head data interpolation from triangular to rectangular mesh.
- Variogram Range:
Range for the chosen variogram.
- Number of Neighbors:
Points used in interpolation.
- OK:
Saves changes and closes dialog.
- Cancel:
Discards changes and closes dialog.
Using Particle Tracking
Import the
.PLBfile using “Read Results…” under the “Results” menuOpen the “Particle Tracking” dialog box (Results → Particle Tracking…)
Configure tracking parameters:
Set “Start/End Time” for particle tracking
Enter tracking duration in “Tracking Time (days)”
Set the “Step Size (m)”
Choose “Forward” or “Backward” for tracking direction
Add particles by clicking “Add” and entering x, y, and z coordinates
Click the button next to “Result Output” to specify the save location and filename
Click “Save”, then “OK” to create the particle-tracking file
Visualizing Particle Tracks
Navigate to “Post Processing” plot items on the “List” tab
Add a “Particle Tracking” plot item
Click the icon next to “File” on the “Attribute” tab
Select your saved particle-tracking file and click “Open”
Customize particle tracks using interface options as needed
| Was this helpful? ... | Itasca Software © 2026, Itasca | Updated: Sep 30, 2026 |
